Hey!
So I'm still in the process of selling the BROS and I've already started on my next project, a Yamaha 1000 EXUP ru. At first sight there are definitely a few things I wanted to change it had already been modified heavily, the fairing had been removed and two spot headlights had been butchered into place.
I started stripping the bike of all the Halfords electrical connectors and nasty components. This meant removing the front lights and I'm also modifying the sub frame and making a seat unit out of sheet ally. I will keep all the electronics standard at the rear including rear light.
However once I got the top off this puppy I noticed the HT cables were like spaghetti above the carbs I'm pretty sure these aren't standard as they also had NGK caps on them as well.
For maximum spark I will cut down these cables as much as I can to reduce resistance and I'll also be rebuilding the plug caps and check they are still holding only 5K Ohms and haven't corroded inside the cap.
After giving the bike a quick once over I wrote up a load of tags with a biro and masking tape this was just to label any electrical connectors and pipes that were bound to confuse me later.
Once the bike was stripped I made a shopping list it went a little like this:
- Iridium plugs
- Battery (yuasa)
- Fuel filter
- Battery strap
- Oil
- Filter
- Copper washer
- 6 Pot sumimoto front calipers/ need a bigger master cylinder
- Caliper rebuild kit
- Carb rebuild kit x4
And a few extra polishing mops
- No air filter needed as a K&N unit has already been fitted into the standard air box so its cleanable. Thats the list for now I plan to get the bike running and electrically sound before I start chopping it up, I would like to use a yamaha MT01 headlight and just adapt the loom to take it.
(Something like this)
- Right Carbs are fully rebuilt, managed to only snap one small brass bolt and stripped one thread. So I re-tapped the thread straight away whilst finding a spare brass bolt to cut down to size. I was lucky that a friend of mine who gas welded a silver rod to the hole to replace the snapped bolt.
- If your trying the same or similar job I would recommend attaching the rubber manifolds to the carbs first then the cylinder head, this photo was taken before I realised that was the correct method, also don't forget to clamp them to the carbs first and rubber grease both sides of the manifold to help the rubber slide and prevent cracking of the rubber!
- This is an ally heat shield I fabricated to hold two breathers and mount the coils, I will polish this to make the engine bay look more detailed.
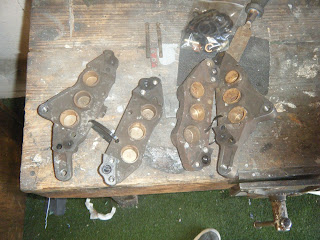
- I had to use a blow torch to break the corrosion holding the Calipers together. Once apart I set about replacing all 24 seals, both dust and hydraulic seals.
- The pistons were seized into place, they wouldn't budge when I plugged and air line into them. At my local garage Viking Classics I used a puller tool with attached slide hammer to remove all of the pistons and then used an array of scraping tools to shift the corrosion that had gathered behind the seals.
- I found a Dremel was most effective at digging the corrosion out. I blew out the remaining dust with air and brake cleaner. The new seals where coated with rubber grease before being slotted back into place.
- New iridium plugs were definitely needed!
- New fuel filter slotted in nicely with rubber grease on the mounting.
- The cam cover bolts were rusted and really needed a little TLC, I had a can of UHT primer knocking about so I gave them a clean and coat. I will paint them gloss black I just need to get some gloss black UHT paint!
- Ally heat shield was rubbed down to 1200 wet and dry and then polished with black Emery soap.
Thats as far as I've got so far, I will update you all when I progress further or more parts arrive!
'Til next time
PRM


No comments:
Post a Comment