Wednesday, 31 July 2013
eBay Store For The Hayabusa Parts
So whilst we're still sorting out a eBay gadget for the blog, here is a link to the parts currently up for auction:
http://stores.ebay.co.uk/PRM-Motors?_trksid=p2047675.l2563
Team PRM
http://stores.ebay.co.uk/PRM-Motors?_trksid=p2047675.l2563
Team PRM
Finished The First Road Bike Project!
So to finish off our first Road Bike project we purchased a leather seat to match the colour scheme and style we were going with from a local source - Le Bicycle.
http://www.lebicycle.co.uk/
A quality shop and a great owner who is always on hand to offer good advice and a helping hand HIGHLY RECOMMEND - the seat was a very competitive price and matched the style well..

So here is a picture of the finished article - we're are undecided as to whether or not we are going to sell this bike yet.. But will update you all in the future.
The transformation..


Now time to find our second project to begin.
Team PRM
Leather Up The Beast!
So my handle bar wraps arrived today from Taiwan - amazing only took a week to arrive!!

I looked at several videos off of YouTube (There are loads!) as it was the first time we had ever taken on a road bike like this. The leather wraps are good quality and did everything they said they would on the tin - I wasn't too sure about the quality but it turned out to be a cheap but good quality buy.
Here is the ebay shop for anyone looking for similar:
http://stores.ebay.co.uk/TakaoBike
Team PRM
Tuesday, 30 July 2013
Success with the Pit Bike
To get the pit bike clutch off I realised I had to hold the clutch to stop it spinning, to hold it I decided to use two original bolts holes and two original bolts. I had some scrap stainless steel I made a wrench from, I drilled one hole and marked out the next carefully, then I beat the plate and clamped it in the vice to give it a nice curve as a handle.


Highly ergonomic if I say so myself.

This was a clutch removal tool I made out of an old socket, I used an angle grinder to chop it to shape.

Ready and waiting for a new primary gear and clutch! only £14 off of ebay!
Monday, 29 July 2013
Brake Cable Worries

The calipers slotted straight onto the exups forks which was good, however now that the calipers are bigger the brake lines are too short. You would think this is a problem but its actually more of a god send.

My BROS had new goodridge brake lines ordered and fitted however they were just a tad too long and looked a bit odd so I decided to take them off and swap them for the exup brake lines that were in ok condition.

The new cables off of the Bros were bolted onto the exup calipers awaiting a new bigger master cylinder, the BROS brakes were put back together and bled once again. Ive left an elastic band around the lever to try and reverse bleed it slowly over night to get the best out of it.

My next little job on the EXUP was to remount the clocks, on the underside of the custom yokes there are four holes for the risers and then two random blank holes, I drilled these carefully a bit deeper and the tapped an M8x1.25 thread down then I will go away and fabricate an aluminium mount for the clocks this will hold the clocks in a lot closer to the yokes and tidy up the front end a lot.
Pit Bike Problems
I took the trusty pit bike out of the shed today for a spin around the garden, after a few exhausting kicks I decided to clean the carb and re seal it with some silicon to give it a better chance of starting. Once this was done it started first kick just as it should.
As I kicked it into gear it suddenly shuddered forward and died, I had the clutch all the way in so this was a slight shock I adjusted it as far as it would go and repeated the process except this time it just cut out straight away! Suspecting worn clutch plates I set about stripping it...

I emptied the oil whilst it was still warm and set about getting the clutch out, I chopped up and old socket to try and get the four tooth bolt out but that didn't go so well. I used and piece of material jammed in between the main gears to hold the clutch stationart but once I applied any large force it suddenly lurched forward. The clutch its self moved but the crank stayed still the clutch is mounts by means of a spline shaft this isn't good, I have just bought a replacement clutch and proper tool for the job I just hope I haven't damaged any other parts of the engine!
This is where it stays for now :(

Chopping up the Exup
Today I laid my spanners to rest and picked up a handy angle grinder, I set about cutting everything that was slightly unnecessary off of the subframe, this is to improve the bikes lines and save a surprising amount of weight!

I also cut down the seat foam and the seat pan. Ive decided to leave the original seat lock the key is on the other side of the bike. Using the steel frame attached to seat frame that houses the seat lock I will weld on a steel plate that will be used to mount the rear light and the new seat unit that I still need to fabricate up.
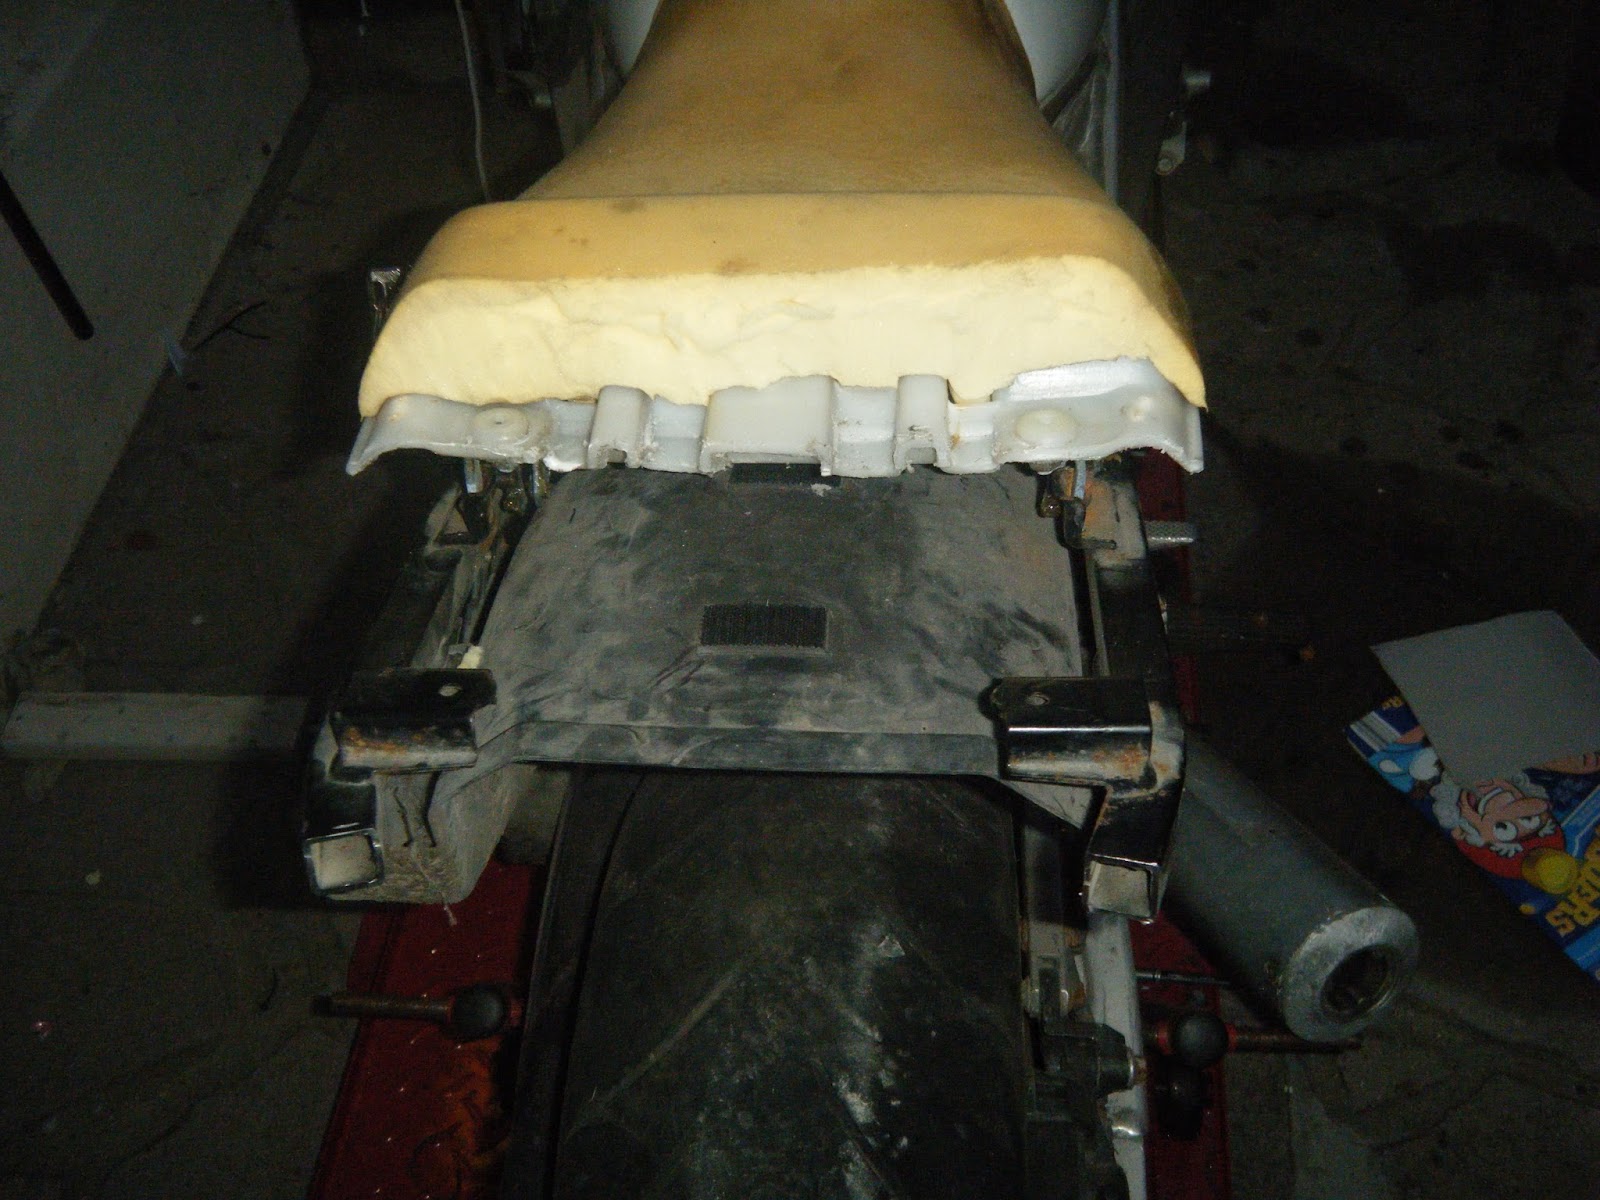
Below show a rough card cut out that will be used to join the rear two beams of the subframe and add rigidity to the subframe. This also meet the rear mudguard and will be bolted to it this should keep the seat and all the wiring dry.

This is another one of my abstract photos, its meant to show a card cut out that meets the seat lock frame at either end and then shows the plate that will be welded on. This plate will first have another plate welded on perpendicular to it this will be the backing for the new seat foam.
On top of this plate I will also fabricate a rear light mount however i will not be using the original rear light anymore as it just looks too big i need a more slim rear end :).

Saturday, 27 July 2013
Finishing the BROS

Today my target was to to finish the BROS completely that meant fitting the front mud guard. This was off of an old English bike, I had to roll it width ways in an English wheel and then open up the bend to reduce the over all radius.
Once the radius was correct it needed to be rubbed down by hand from 120 to 1200 grit once this was done I started on polishing thanks to the shape of the mudguard it was relatively easy, I clamped the drill and mop in the vice and moved the part around the drill for a change.

There are spacers from the fork brace down these are made from ally tube they have been cut and ground down so that they fit as flush as possible, they meet on two uneven and curved surfaces so the spacers took a lot of adjusting.

This holder was rubber greased up and pushed into the whole.

I painted and greased the rear caliper pad because its very visible. I polished up the wheels and tank with some auto glym highly recommend this polish for painted surfaces.

This is the final touch the badges have had the screw heads stuck in with glue now they just need to be glued onto the tank.
As this job almost makes or brakes the bike I left it to extreme customs painter Sol. He's based in Essex so ill have to wait until the morning when it's finished!
Breaking the Hayabusa
A friend of mine had tried to build a streetfighter based on a Suzuki Hayabusa GSXR1300R 1999. It had a gas flowed engine with barely any miles and four new pistons. He had a new wide swinging arm made to take a 300 section tyre that had a custom billet rear wheel. Along with some custom yokes, tank headlight dial and K4 seat unit it had the ingredients to be a superb bike.
However a lot of money and time later the Suzuki B-king came out and he bought one and put some of the parts from the project on the B-king and fell in love with it!
This left him with boxes full of original parts and an almost complete bike, this sat for a few years in various garages and he has finally decided to flog the lot clear out a load of space and move on before he has to start worrying about corrosion destroying all the parts.
This is where I come in I will take all the parts log what I have, price it and then pop all the bits up on ebay undercutting all the other parts up there to ensure it all goes quick!
PICS COMING UP SOON!!!!!!!
Heres a list of all the bits incase you are interested at all:
| Air filter |
| Head light and fairing |
| Steering Damper |
| Headlight brackets and fork clamp x4 |
| Bulb holder |
| Talon rear sprocket |
| Clutch Cover |
| Cam Chain x2 |
| Alternator Generator x2 |
| Negative Battery Wire |
| Cam chain tensioner/guide |
| Coolant hose connector x2 |
| Engine oil plug |
| Gear box bush x2 |
| Clutch Springs |
| Sprocket cover |
| Clutch slave cylinder |
| Stator cover |
| power commander |
| Cam set x2 |
| Clutch basket platesand hub clutch |
| Rear shock |
| Top Yoke |
| Suzuki GSXR K4 Brake light |
| Foot pegs |
| 2nd air system |
| Thermostat |
| LHS switch gear |
| Coolant hose |
| Cam chain tensioner x3 |
| Expansion Tank |
| Chain Guard |
| Throttle cable guide |
| Piston x4 |
| Fan |
| Fairing |
| Subframe |
| Clocks |
| Triumph Front Wheel |
| Brake Light |
| Suspension Linkage Heres my email you can contact me for pictures and prices. prmmotors@gmail.com |
Tuesday, 23 July 2013
Retro Racing Green & Brown Leather
So I've been looking over the internet for some parts to add to my road bike - which is definitely a working progress!!
Im thinking of a retro scheme, I've just purchased these off of ebay - when they arrive I'll update you with the quality and the seller I used.
sE9swm,vp8BRbSG+s5vg~~60_3.JPG)
I think Im going to go for a brown handle and saddle combo, which I think will go well with the current tyres and racing green frame. Hopefully...
Will update you more when the parts arrive
Team PRM
Lift Off!
So thanks to some investment from my dad I managed to upgrade my shed a little and got one of these beasts!

The EXUP on the bench will be the fourth bike i would of made and the second custom I've made in my garage! Thankfully i now have a bench which should make work a lot more comfortable and therefore better!
The Exup is a heavy beast so ive strapped it down just to be sure.
The lift itself is a SEALEY item and came with all the instructions and nuts and bolts assembly was a doddle. However the front wheel clamp wasnt any good and didnt support the bike at all! Other than that the function of the pump and the finish is excellent very impressed for £400.
Road Bike Rebuild
So I jumped onto the road racing bike hype and managed to pick up an old french road bike for £50 off of ebay <--- highly recommend!
It was originally blue and needed revamping so first thing I did was sand it down and give it a new coat of racing green paint with plenty of lacquer. I bought a new freewheel rear 7 speed cassette and used a new SRAM mountain bike derailer, this bike isnt for race used just to get about on.
Plus its had a new chain.
What do you think?

Next I plan to remount the front brake and bars, the bar mount will be polished along with the cranks and front gear cover.
I will be running this bike with just a front brake.

This is the bike ready for its test run, on its first trip we found one of the front brake pads was sticking and the bearings in the left pedal were shot and felt loose.
Parts that we need to buy will be brown leather seat and brown handle bar grips, new pedals maybe cranks and new brake pads.
Sunday, 21 July 2013
EXUP calipers
These are the calipers that will be going on the bike they are off of a bigger yamaha they are sumimoto 6 pots. Along with these there will be a bigger master cylinder probably off of a busa or maybe a V max.

- First things first was to take them apart both of the calipers were off of a shelf this is bad because we can use the hydraulic pressure the push the pistons out a bit and chances are they are very well seized up.
- The pads are held on with two pins and one of these in each caliper was completely seized, after alot of blow torching and pulling they came apart.

I used a puller tool at my local garage Viking Classics to get the pistons out. The old seals were thrown and then the cleaning took place Viking Classics have a good array of tools to pick and scrape off corrosion. The dremmel proved most efficient in clearing the seal cavities. The calipers were sprayed with brake cleaner and blown down with a compressor thoroughly before the new seals were rubber greased up and pushed in.


- Each piston need to be wire brushed clean before assembly, the pistons them selves have a plating on them it is important not to take this off as is will end up in further corrosion and possibly a hydraulic leak!
- In the servicing kit there was also the seal that fits between the two halfs of the caliper and there were new bleed nipples which is always useful! I think the kit cost around £65 for completely serviced brakes!
- Bleed nipples had copper slip on the thread and rubber grease on the cap to protect it.

EXUP carbs

 If your trying the same or similar job I would recommend attaching the rubber manifolds to the carbs first then the cylinder head, this photo was taken before I realised that was the correct method, also don't forget to clamp them to the carbs first and rubber grease both sides of the manifold to help the rubber slide and prevent cracking of the rubber!c
Saturday, 20 July 2013
Bring On The Yamaha!
Hey!
So I'm still in the process of selling the BROS and I've already started on my next project, a Yamaha 1000 EXUP ru. At first sight there are definitely a few things I wanted to change it had already been modified heavily, the fairing had been removed and two spot headlights had been butchered into place.
I started stripping the bike of all the Halfords electrical connectors and nasty components. This meant removing the front lights and I'm also modifying the sub frame and making a seat unit out of sheet ally. I will keep all the electronics standard at the rear including rear light.

However once I got the top off this puppy I noticed the HT cables were like spaghetti above the carbs I'm pretty sure these aren't standard as they also had NGK caps on them as well.
For maximum spark I will cut down these cables as much as I can to reduce resistance and I'll also be rebuilding the plug caps and check they are still holding only 5K Ohms and haven't corroded inside the cap.

After giving the bike a quick once over I wrote up a load of tags with a biro and masking tape this was just to label any electrical connectors and pipes that were bound to confuse me later.
Once the bike was stripped I made a shopping list it went a little like this:
- Iridium plugs
- Battery (yuasa)
- Fuel filter
- Battery strap
- Oil
- Filter
- Copper washer
- 6 Pot sumimoto front calipers/ need a bigger master cylinder
- Caliper rebuild kit
- Carb rebuild kit x4
And a few extra polishing mops

- No air filter needed as a K&N unit has already been fitted into the standard air box so its cleanable. Thats the list for now I plan to get the bike running and electrically sound before I start chopping it up, I would like to use a yamaha MT01 headlight and just adapt the loom to take it.
(Something like this)
- Right Carbs are fully rebuilt, managed to only snap one small brass bolt and stripped one thread. So I re-tapped the thread straight away whilst finding a spare brass bolt to cut down to size. I was lucky that a friend of mine who gas welded a silver rod to the hole to replace the snapped bolt.
- If your trying the same or similar job I would recommend attaching the rubber manifolds to the carbs first then the cylinder head, this photo was taken before I realised that was the correct method, also don't forget to clamp them to the carbs first and rubber grease both sides of the manifold to help the rubber slide and prevent cracking of the rubber!
- This is an ally heat shield I fabricated to hold two breathers and mount the coils, I will polish this to make the engine bay look more detailed.

- These are the servicing parts waiting to be put in the bike!


- I had to use a blow torch to break the corrosion holding the Calipers together. Once apart I set about replacing all 24 seals, both dust and hydraulic seals.

- The pistons were seized into place, they wouldn't budge when I plugged and air line into them. At my local garage Viking Classics I used a puller tool with attached slide hammer to remove all of the pistons and then used an array of scraping tools to shift the corrosion that had gathered behind the seals.
- I found a Dremel was most effective at digging the corrosion out. I blew out the remaining dust with air and brake cleaner. The new seals where coated with rubber grease before being slotted back into place.
- New iridium plugs were definitely needed!

- New fuel filter slotted in nicely with rubber grease on the mounting.

- The cam cover bolts were rusted and really needed a little TLC, I had a can of UHT primer knocking about so I gave them a clean and coat. I will paint them gloss black I just need to get some gloss black UHT paint!


- Coil brackets were cleaned and painted gloss black.


- Ally heat shield was rubbed down to 1200 wet and dry and then polished with black Emery soap.

- Finally I applied brown Tripoli soap.

Thats as far as I've got so far, I will update you all when I progress further or more parts arrive!
'Til next time
PRM
Thursday, 18 July 2013
The BROS is BOSS
So I thought I better get this blog moving...
I'm just putting the finishing touches to my Honda Bros 650 cafe racer which passed its MOT this week!! I'm looking forward to showing off my first piece at a few shows, hopefully raise its profile a bit before I sell.
Heres the almost finished beauty..
plus the sound track...
plus the sound track...


-The exhaust had standard down pipes and a Kerker end can originally, this can was swapped with a TYGA Maggot Moto that lets the bike rev really well and sounds incredible on the down revs. The kerker unit was used to get it through an MOT.

-Front end is off of a Suzuki Bandit 400 import that has Tokico calipers and twin discs but is the exact same dimensions as the originals. This has had new Hagon springs and 10 weight oil to beef them up a bit.

-The tank was washed through thoroughly as it had endless amounts of gunk inside this was done with fuel, I had to remove the tap to speed it up a little, the tank was sent away to has the rust sorted inside and repainted by extreme custom in Essex. Who did an amazing job as ever using aluminium flake and extra lacquer to give it a unique sparkle.
-The seat foam had also been cut and needed alot of material added to fit the rear hub this was done by Lee Hutchings Motorcycle seat specialists in a day for £100 pounds and was with out a doubt the fastest part of the project I was very impressed at his speed and attention to detail.


Heres a few extra things its had done!
-Carbs were degreased stripped blown through thoroughly and rebuilt with new seal throughout.
-All four plugs were replaced with iridium items the front left plug proved very challenging as it is buried very deep in the head, Pat Higgins from Viking Classics lent me one on his home made tools made for that exact plug! Worth the trouble though as the plug that came that out looked like it had been at the bottom of the sea.
-A new battery was fitted. (yuasa)
-The final jobs included painting the sub frame, polishing the rear hub and going over the other surfaces, mounting and wiring indicators fitting headlight brackets, fixing a few earths on the bike, adjusting the steering stops to ensure the bars dont fail the tank, aftermarket footpegs, Renthal grips, levers and wing mirros.
PRMM has been stamped into the bike frame and custom parts plus the year it was made to help me keep track of what I make!
I'll be going to the race cafe very soon to show it off!
-There were a couple last tweaks that had to be made:
-The forks were taken out given 10 weight oil and bigger hagon springs to beef up the front end.
-The front mudguard is being replaced for an aluminium one the I have rolled on a english wheel to fit a 17" wheel. I will be using the original fork brace as a mount so now spacers need to be made to make it fit correctly. Im going down to the machine shop in a couple of days to finish the bike!!!
Subscribe to:
Comments (Atom)